Usage of Passport JWT Strategy for Authentication in Socket.IO
Passport is an authentication middleware for Node.js that provides dozens of pluggable authentication mechanisms. You might already have implemented a Node.js backend with Express (and Passport). And now you’re wondering how you can protect the WebSocket communication between backend and frontend from unauthenticated access? Perhaps you don’t want to implement authentication twice, but want to reuse your existing Passport authentication via JSON Web Tokens (or any other strategy e.g. basic auth)? Then, this blog post is meant for you!

In this blog post, I’ll show you how to implement a Node.js application with Socket.IO and then how to integrate Passport to add authentication to the WebSocket-based API. In specific, I’ll demonstrate authentication using the example of the passport-jwt strategy, a Passport authentication strategy that uses JSON Web Tokens (JWT).
1. NPM project
Let’s get started by initializing an NPM project and installing all required NPM packages:
npm init -y
npm install express passport passport-jwt socket.io
2. Express app
Create a file named server.js and paste the following code to bootstrap your Node.js backend:
server.js
'use strict';

const port = process.env.PORT || 3000;

const app = require('express')();
const httpServer = require('http').createServer(app);
const path = require('path');

function log(...args) {
    console.log(new Date(), ...args);
}

app.get('/', (req, res) => {
    res.sendFile(path.join(__dirname, 'index.html'));
});

httpServer.listen(port, () => {
    log(`Listening on http://localhost:${port}`);
});
So far, your application contains only one HTTP endpoint GET / that responds with an HTML file. Let’s create the HTML file index.html:
index.html
<!DOCTYPE html>
<html>
<head>
    <meta charset="utf-8">
    <title>Socket.IO with JWT Authentication</title>
</head>
<body>
    <h1>Socket.IO with JWT Authentication</h1>
</body>
</html>
You can start the Node.js backend with this command:
node server.js
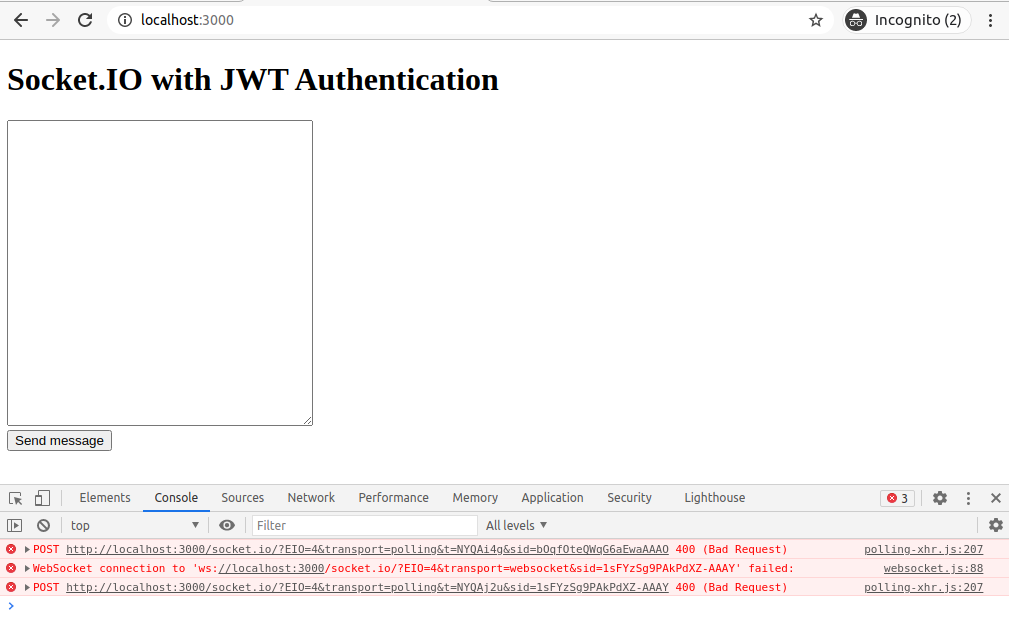
Node.js should print Listening on http://localhost:3000 and you should see the heading Socket.IO with JWT Authentication when you navigate to http://localhost:3000 in your browser.
3. Add Socket.IO in frontend and backend
On the server side, import the NPM package socket.io and define event handlers for the events connection and message:
server.js
const io = require('socket.io')(httpServer);

io.on('connection', (socket) => {
    log('new socket connection');

    // On receiving the event 'message', we'll respond with the same event back
    // to the client's socket.
    socket.on('message', (message) => {
        log(`Socket.IO event 'message' from client with payload: ${message}`);
        socket.emit('message', `server response: ${message}`);
    });
});
On the client side, we can use a CDN to import Socket.IO’s client library. Similar to the backend’s code, we initiate the socket connection and then define three event handlers for the connect, disconnect, and message event. Furthermore, we add a textarea for logging purposes and a button to manually send a message via the WebSocket connection to the backend:
index.html
<!DOCTYPE html>
<html>
<head>
    <meta charset="utf-8">
    <title>Socket.IO with JWT Authentication</title>
</head>
<body>
    <h1>Socket.IO with JWT Authentication</h1>
    <textarea style="width: 300px; height: 300px"></textarea>
    <br>
    <button onclick="sendMessage()">Send message</button>

    <!-- Imports Socket.IO client library from CDN. Pay attention, the
        version of the client lib must match the version of the NPM package
        `socket.io` that is used in the Node.js backend. -->
    <script src="https://cdnjs.cloudflare.com/ajax/libs/socket.io/4.0.0/socket.io.min.js"></script>
    <script>
        // Initiates the Socket.IO connection to the Node.js backend
        const socket = io.connect();

        socket.on('connect', () => {
            log('Connected to server');
        });
        socket.on('message', (message) => {
            log(message);
        })
        socket.on('diconnect', () => {
            log('Disconnected from server');
        });

        function log(message) {
            document.getElementsByTagName('textarea')[0].value = document.getElementsByTagName('textarea')[0].value + '\n' + message;
        }

        /**
         * Emits a `message` event with the payload `Hello, world` which
         * is send via the WebSocket connection to the Node.js backend.
         */
        function sendMessage() {
            socket.emit('message', 'Hello, world');
        }
    </script>
</body>
</html>
You can now restart the Node.js backend to see the changes in action as shown in the following GIF:
4. JWT generation
For authentication, we’ll chose the Passport strategy passport-jwt. This strategy is based on JSON Web Tokens (JWT).
JWT is an open standard that is based on signed JSON objects. In case of a successful login, the backend or an authorization server generates a JWT. A JWT consists of three parts: a header, the payload, and a signature. Header and payload are signed with a secret and then included into the JWT as the third part. The resulting JWT is returned to the client / browser. In the following, the browser includes the JWT with each HTTP request. That way, the backend can validate each HTTP request by comparing the signature with the header and payload. To learn more about JWT read this Introduction to JSON Web Tokens.
To simplify this tutorial, we’ll skip the implementation of a login and the JWT generation. Instead, let’s mimic the authorization server by manually creating a valid JWT on https://jwt.io/:
- Set the algorithm to HS256 which is short for HMAC-SHA256 and represents a symmetric key encryption.
- Change the payload so that it includes subject (
sub) 1001 and name admin:{ "sub": "1001", "name": "admin", "iat": 1516044444 } - For the sake of this tutorial, we’ll use
secretas our secret to generate the JWT signature. Please note that you should use more complex secrets in production use cases and never hard-code your secret into your code.

This configuration yields the following JWT:
eyJhbGciOiJIUzI1NiIsInR5cCI6IkpXVCJ9.eyJzdWIiOiIxMDAxIiwibmFtZSI6ImFkbWluIiwiaWF0IjoxNTE2MDQ0NDQ0fQ.aWj5grFWJwcsbgxNJ7HdfL5PUfD8fMh9GwXutuR86GE
5. Integration of Passport
Add these imports in server.js to integrate Passport:
server.js
const passport = require('passport');
const JWTStrategy = require('passport-jwt').Strategy;
const ExtractJWT = require('passport-jwt').ExtractJwt;

const User = require('./user-service');
Register the JWTStrategy, specify the same secret as we previously did while generating the JWT, and set the algorithm to HS256:
server.js
const secret = process.env.SECRET || 'secret';

passport.use(new JWTStrategy({
    jwtFromRequest: ExtractJWT.fromAuthHeaderAsBearerToken(),
    jsonWebTokenOptions: {
        ignoreExpiration: false,
    },
    secretOrKey: secret,
    algorithms: ['HS256'],
}, (jwtPayload, done) => {
    try {
        const user = User.findById(jwtPayload.sub);
        if (!user) {
            return done(null, false);
        }
        return done(null, user);
    } catch (error) {
        return (error, false);
    }
}));

passport.serializeUser(function (user, done) {
    if (user) done(null, user);
});

passport.deserializeUser(function (id, done) {
    done(null, id);
});
This Passport plugin automatically validates the JWT signature given our secret which we previously used to sign our JWT. If the JWT has not been tampered with, then Passport injects the JWT’s payload into the callback function. Passport refers to this callback as the verify callback (see the docs to understand its purpose). In this callback, we have to validate / search for a user that matches the credentials which have been specified in the JWT. In our case, we can search for a user that possesses the specified sub/subject ID. Passport then attaches the found user object to the Socket.IO request object which can be used in the following to apply user-specific actions on the server side (e.g. retrieve a user’s personal list of orders / recipes / etc.).
For this purpose, let’s define a dummy user service in user-service.js which contains only one valid user with name admin and id 1001. This user corresponds to the values which we previously included in the payload of our generated JWT:
user-service.js
'use strict';

module.exports = {
    /**
     * @param {string} userId
     * @returns {{id: string, name: string}}
     */
    findById: function (userId) {
        return users.find(u => u.id === userId);
    },
};

const users = [
    {
        id: '1001',
        name: 'admin',
    },
];
Finally, register Passport as a middleware for Socket.IO. Because middlewares in Socket.IO have a different function signature than those in Express, we have to define a wrapper function:
server.js
const wrapMiddlewareForSocketIo = middleware => (socket, next) => middleware(socket.request, {}, next);
io.use(wrapMiddlewareForSocketIo(passport.initialize()));
io.use(wrapMiddlewareForSocketIo(passport.session()));
io.use(wrapMiddlewareForSocketIo(passport.authenticate(['jwt'])));

io.on('connection', (socket) => {
    ...
}
If you restart the Node.js backend and then reload your browser tab at http://localhost:3000, then your browser should not be able to establish a WebSocket connection to the backend due to authentication failure. We’ll resolve this issue in the last step of this blog post.
6. Include JWT in Socket.IO Connection
Per default, JSON Web Tokens are transmitted via the Authorization header. This HTTP header typically includes the keyword Bearer followed by a blank and the actual JWT. You can change this behavior by changing the line
jwtFromRequest: ExtractJWT.fromAuthHeaderAsBearerToken(),
in server.js which configures the Passport JWT strategy.
The last remaining step is to include the Authorization header in your website’s code which initiates the Socket.IO connection. Therefore, replace the existing connection setup in index.html with the following code:
index.html
const socket = io.connect('', {
    extraHeaders: {
        Authorization: "Bearer eyJhbGciOiJIUzI1NiIsInR5cCI6IkpXVCJ9.eyJzdWIiOiIxMDAxIiwibmFtZSI6ImFkbWluIiwiaWF0IjoxNTE2MDQ0NDQ0fQ.aWj5grFWJwcsbgxNJ7HdfL5PUfD8fMh9GwXutuR86GE",
    },
});
After reloading your browser tab at http://localhost:3000, you should be able reestablish a Socket.IO connection.
Conclusion
Thank you for reading this blog post and good luck with your project! You can find the complete source code of this demo application down below or in this gist on GitHub. I hope that this blog post helped you to implement your own Node.js app with Socket.IO and integrate JWT authentication via Passport.

Entire code of this demo app: